Sunday, October 7, 2012

Alabama Chanin Poncho Finished!

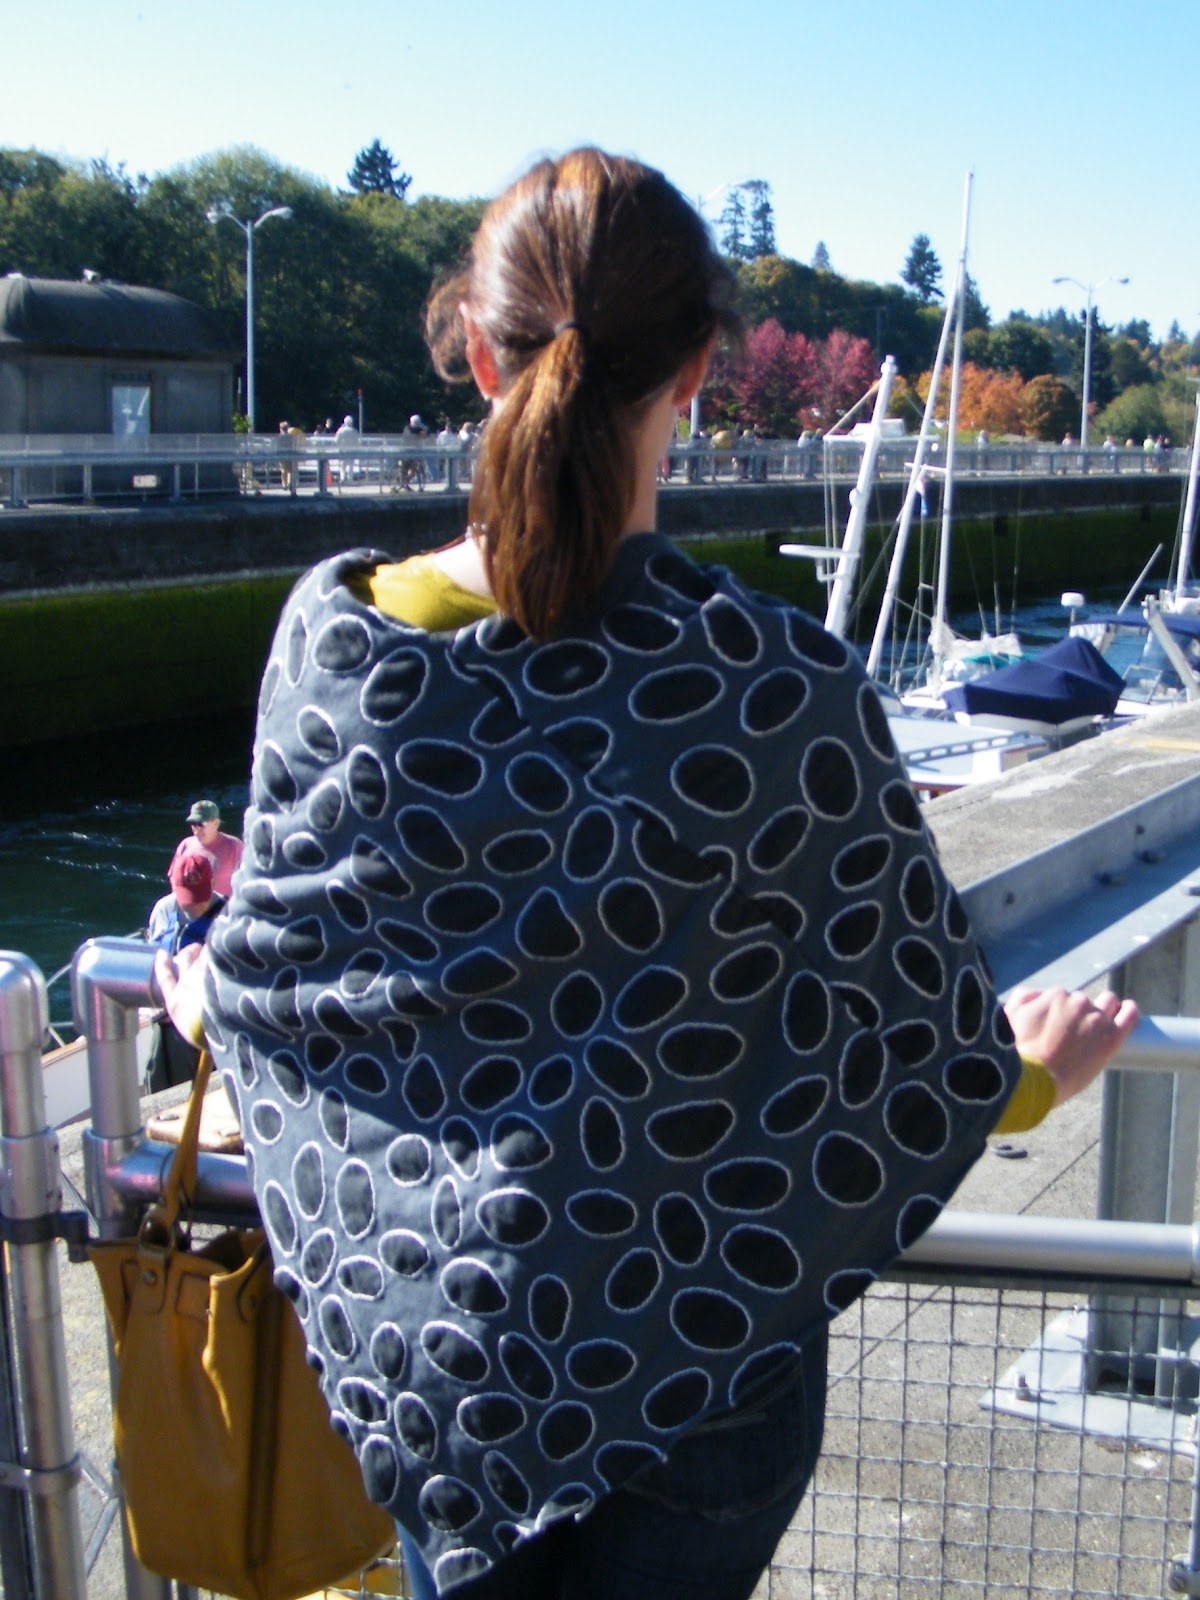
Today I tooled around the Ballard Locks in my snazzy finished Alabama Chanin Poncho. It really is a great layering piece.  It effortlessly dresses up a t-shirt and jeans combo.  What mom doesn't need that?


I really feel good wearing it too.  I was afraid it might be cumbersome, but it isn't.  At least it isn't when your just tooling around.

Cheers!
Sonja

Friday, August 17, 2012

Chanin Poncho Progress

Progress is always good!


Slow....but good.

 I touched up a few of my stones as the paint was a bit blotchy.  They are still drying and appear darker in this photo.  After completing more of the stitching I decided to leave the stones whole.  That was my original plan.   I am sticking with it!

This is what my stencil looked like.  I used a cardboard pizza round.  I then traced my stones onto the fabric with a Micron pen.  Finally, I filled the shapes in with a small paintbrush and my fabric paint.  I actually found that I preferred this method to the regular stencil method.  I felt like I had way more control over where the paint ended up.

Cheers!
Sonja

Friday, August 10, 2012

Chanin Poncho Beginning

I am at the very beginning of stitching on a Alabama Studio Sewing + Design Poncho.  Excuse my wrinkles.

I am trying to use up the rest of this fabric from the making of my first Chanin piece.  Frankly, I do not love the color (Blue Slate) on me for the summer.  I am hopeful that I will like it more paired with black for the fall.

This is the photo that inspired me. 
(photo credit: Alabama Chanin)
I love how the circles are not perfectly round.  More organic.  They remind me a bit of river stones.  So that is what I set out to stencil on my poncho. 

Now that I have started stitching I am thinking it might be best to cut out the centers of my river stones.  A decision must be made quickly and I am utterly torn!   Thoughts?

Cheers!
Sonja

Monday, August 6, 2012

Alabama Chanin Tunic + Bolero

Finished an Alabama Chanin Fitted Tunic & Bolero from the book Alabama Studio Sewing + Design by Natalie Chanin.  Pictures taken by my 5 year old are not shot at the most flattering angle and a bit fuzzy to boot.  At this moment that's what I have to work with!


Double Layer Tunic
Fabric: Chanin cotton jersey ordered from the Alabama Chanin website
Size: Medium (I am 5"10 and 140 pounds)
Embroidery: Cretan Stitch

Double Layer Sleeveless Bolero
Fabric: The same
Size: Large.  I cut out a medium first.  I felt the fit was too "shrunken" looking.
Embroidery:  Cretan Stitch


These pieces were wearable muslins for me.  I am always weary of fit.  So to save my valuable time I machine stitched the seams and felled them on to check fit.  Machine seaming makes this a speedy project and I was able to complete both pieces with only about 4 hours of hand stitching.  I prefer the look of the hand felled seams but don't see much of a difference in the machine seaming if felling is to follow.

Happy Stitching!
Sonja

Wednesday, August 1, 2012

West Hill Picnic Top

The lovely Heather of Featherty Sews sent me a precious yard of Heather Ross West Hill Riding Clothes for my horse loving daughter Soren.  I held on to that yard of fabric for a year and a half waiting for the perfect garment pattern to come along.  Now that Soren is moving into a size 10, try as I might I just couldn't squeeze something to wear out of it.  Something worth cutting into that fabric.  Does that ever happen to you?  You hang on to a piece of fabric because you feel it has to be used in a special way.  Or you don't want to risk wasting it?

So where my fear and indecision slammed the window shut on sewing for Soren there was still a crack in Ms. Ella's window. Ella won the lottery on this fabric and luckily she is horse crazy too.


I have to admit I was racked with fear after I measured Ella, selected the corresponding size and started cutting. Kicked myself for not making a muslin. Then decided that if it didn't fit I would donate it to a charity auction. All turned out fine. I think the fit is cute and a bit reminiscent of the 60's.


 I added black maxi piping to the front bodice seam as I have seen a few other folks do.  It really is a nice touch.

Pattern:  Oliver & S Picnic Top
Fabric:  West Hill by Heather Ross
Size: 6 with no pattern modifications
Trim: Black maxi piping
Ella: 47" Tall and 45 pounds with a chest circumference of  22"

Cheers!
Sonja

Monday, July 23, 2012

Fall Sewing!

I know!!!!  It is entirely too early for starting fall sewing.  In most of the US that is probably the truth......ahem.  But here in the great Pacific Northwest it is only in the 60's.

Brrrr! 

These fleece coats are just the ticket for our chilly mornings on the coast.  Fleece is our year around friend.


Ella's Black & White Polka Dot coat Stats:
Pattern: Farbenmix Jade
Fabric: Fleece
Trim: velvet, lace and ric rac
Size: 128/132
Ella is 5 1/2 years old, 47" tall and 45 pounds


Soren's Grey Coat Stats:
Pattern: Farbenmix Jade
Fabric: Fleece
Trim: embroidered, velvet, lace and ric rac
Size: 134/140
Soren is 8 1/2 years old, 53" tall and 60 pounds
I made the pockets much deeper on this one and also added a Parka Zipper (it can unzip from the bottom up).

I love this pattern!  It goes together quickly and I think the results are charming.  The fit is super cute and very comfortable.  This pattern has a big sister called Jadela which is sized from tween to adult.  I am on the hunt for it! 

Thursday, May 31, 2012

Kitchen Table Crafting

Nope! Not crafting on the kitchen table.  Crafting a kitchen table.  Our kitchen dining area is an odd size which I really needed to maximize.  After more than a year of searching for the perfect table in the perfect size with the perfect price tag I had to call it quits.  It just wasn't going to happen.  So what does a crafty girl do?  Makes what she needs!
 Thanks to woodworking plans by Ana White and a long holiday weekend my hubby and I were able to build and sand this 36x 72 inch table in about 10 hours.  The hardest part was waiting for stain, paint and poly coats to dry.  The finishing of the table took me about 2 additional days.
 We used a cross between the Ana White Rustic Table and the Farm House Table. Our wood was just common pine from Home Depot.  I think the 4x4's are actually some other kind of wood. Not sure.
 I used two coats of stain after a coat of wood conditioner.  The first was Minwax English Chestnut.  It made the wood far to red.  Then I put a coat of Minwax Provincial over it and that worked pretty well on the top and apron.  However the legs just did not accept the stain the same way.  So in the end I painted the legs and apron.  Which was actually what I really wanted.  Hubby did not : )  The legs and apron are painted in a flat paint which I will wax today. 


This weekend I will be building two of these by myself ! This is the Vanessa X Bench.
I will change the plans a little bit as these will be used inside.  I will also be making covers and cushions for the tops of the benches.  Like these from Coastal Living Magazine.